Snapshots are a data archive containing either assets or database, or both. The archives bear sspak extension and can be built or accessed locally using the SSPak command-line tool. Manual access is also possible - sspak format relies on tar and gz to bundle the necessary files. You can find out more about the format on the SSPak page.
The “Snapshots” area in the Silverstripe Cloud is a staging area of shared storage. Instead of uploading the data straight to the environment or backing it up straight to your developer machine, the snapshots are first written to this area. This allows you to share snapshots and move them between stacks and environments you have access to without the need to download.
Staging area includes a soft quota. Once you exceed it you won’t be able to make any more snapshots (automated backups don’t count). You can exceed your quota if you upload a single large file. Quota is set per stack and is shared among all environments.
Snapshot staging area has a concept of ownership. The “Environment” column specifies which environment the snapshot is assigned to. You will only be able to access snapshots on the environments you have access to. You can also snapshots between environments.
You can access snapshot logs at any time in the “History” section.
Working with snapshots
The following actions can be performed on snapshots. Availability will rely on your permission level.
- Create snapshot: backs up the data from selected environment into the staging area.
- Upload snapshot: uploads data from your machine to the staging area.
- Delete: permanently delete the snapshot from staging. You will need to do this periodically to fit in the quota.
- Download: access the snapshot in the staging area.
- Restore: restore the snapshot onto the environment.
- Move: change ownership of the snapshot. This is largely only useful for users with access to production environments.
As a general guideline the potentially harmful actions you need to be mindful about are (1) the restore, where you push data to an environment and (2) “move” where (as a privileged person) you could make confidential data available to outside of your organisation.
Snapshot actions
To access snapshots go to Silverstripe Cloud and log in. Select a stack from the list and click the ‘Snapshots’ item.

Creating snapshots
In the snapshots interface click ‘Create snapshot’.

Select the environment from the dropdown and select the type of snapshot you want to create. The types are:
- Database & Assets - This includes an SQL dump of the database and everything in the Silverstripe CMS assets folder.
- Database only - This includes only the SQL dump.
- Assets only - This includes only the files in the assets folder.
When you’ve selected an option you can click the ‘Create’ button which will start the snapshot progress. This can vary in time depending on the size of the data.

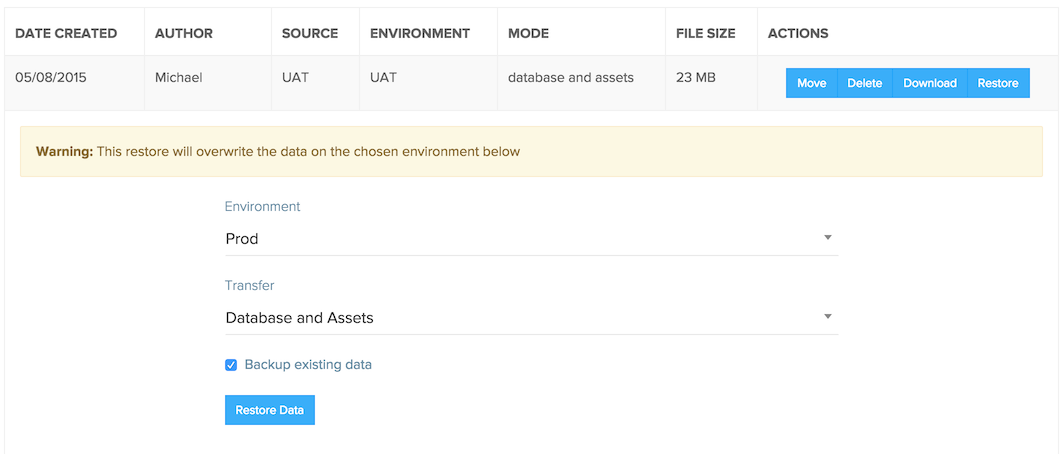
Restoring snapshots
To restore a snapshot to an environment click the ‘Restore’ button in the snapshot list. Select the target environment, and choose which part of the snapshot to restore.
In some cases before you can trigger the restoration, a check will be performed to confirm available disk space on your environment. For large snapshots, snapshots restored for the first time, or environments with large amount of assets, this two-step process can take a long time:
- Uncompressed sizes of snapshot components will be obtained. This process is capped at 2 minutes, and only done once per snapshot (values are cached). As a rule of thumb, counting a 1 GB snapshot can take around 10s.
- Sizes are compared with available free disk space, to estimate if the snapshot is likely to succeed. This process is also capped at 2 minutes, but is done every time.
Downloading snapshots
To download snapshots click the “Download” button next to the snapshot you have access to. This will download an sspak file to your local machine.
Uploading snapshots
To upload snapshots, go to the “Upload snapshot” tab. Snapshots must be in sspak format. The contents of the file is not autodetected, so the form allows you to specify what the file contains manually, which will limit the available restoration options.
You must also choose which environment the new snapshot should belong to, which determines the access permissions. Snapshots can be transferred between environments once uploaded.

Once uploaded, the snapshot will appear in the staging area.
Large snapshots
If your sspak is larger than the maximum file size limit click the ‘File exceeds …?’ button. This will provide further instructions on how you can send files to us that are too large to be uploaded directly.
Working with snapshots locally
To get started working with sspak files locally you’ll need to install sspak. Note that Windows users will also need to install third party software as the sspak tool does not natively support Windows.
Creating sspak locally
After installing sspak tool you can run one of the following commands to create a snapshot assuming /var/www/project1 is the public root. These should be run as your web user. This is typically www-data on Debian and Ubuntu Linux, or the current user if you’re using Windows.
# Database & Assets
sspak save /var/www/project1 project1.sspak

# Database Only
sspak save /var/www/project1 project.sspak --mode db

# Assets Only
sspak save /var/www/project1 project.sspak --mode assets
Restoring sspak locally
Assuming /var/www/project1 is the public root of your website, the following command will load the snapshot into your local environment.
sspak load project1.sspak /var/www/project1
You should run this as your web user or current user if you’re using Windows.
Production data
Production data needs special protection: the backup and download need to be restricted because it can contain confidential information, and restore needs to be restricted because it can break the production site. This should remove active user sessions so you might want to remind users they will need to re-authenticate.
If you are a privileged user you are responsible for making sure the confidentiality of the data is preserved. Using the “move” feature might mean that people from outside of your organisation will gain access to the data.
As a non-privileged user you will not have access to the production environment. You will need to talk with a privileged user to organise the backup or restoration for you.
Making production snapshots
If you are a privileged user you can snapshot production directly. These snapshots are at first “owned” by production environment and will not be accessible by non-privileged users.
You can immediately make a snapshot available by selecting the “move” action and transferring the ownership to another environment. From that point onwards the snapshot will be available to all non-privileged users on that stack.
You can also download the snapshot to your local machine and perform the sanitisation tasks before making it available to others.
Restoring to production
If you are a privileged user you will be able to restore snapshots to production at any time.